
Sunday, February 17, 2008
Ooh you tasty little things...: I'll daydream about Tropical climates, you make some caramel apple pie cupcakes, and the robots? They'll learn to use
Ooh you tasty little things...: I'll daydream about Tropical climates, you make some caramel apple pie cupcakes, and the robots? They'll learn to use forks. Goodness these look amazing...I'm definitely going veganize this recipe!
Sunday, February 10, 2008
Chocolate Chip Scones
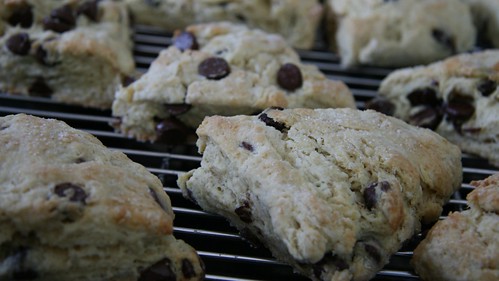
Yum! I do love a good scone now and again, and today seems like a nice day for baking. And scones are so easy to make! I like mine with chocolate chips, but they're just as good plain, with berries or with nuts, so you can throw in whatever suits your fancy (or whatever you happen to have on hand).
Ingredients:
2 cups flour
2.5 teaspoons baking powder
1 teaspoon salt
2 tablespoons sugar
1/4 cup shortening/crisco
1/2 cup soy milk
1.5 teaspoons egg replacer + 2 tablespoons warm water
1/2 to 3/4 cup chocolate chips
Instructions:
Stir together the dry ingredients. Cut the shortening in finely, then stir in the soy milk and egg replacer. When well mixed, add in the chocolate chips and mix. Roll dough out about 1/4" thick and cut into triangle shapes. Place them on a baking sheet, leaving some room between each scone, and brush the top of each with a little soy milk, then sprinkle with sugar. Bake at 450 degrees F for about 10 to 12 minutes, until golden. So delightful!
Sunday, February 3, 2008
Stuffed Cabbage
I've been vegan for nearly twelve years now, and I never feel like I'm missing out on anything because I can veganize basically any recipe. My grandmother on the Slovakian and Polish side of the family used to make fantastic stuffed cabbage for holidays. I have been in the mood for stuffed cabbage all day today, so I'm posting my altered version of her basic recipe to remind myself to buy cabbage next time I'm at the market so that I can make this!
Ingredients:
2 packages of veggie ground meat subsitute (I prefer the Lightlife Smart Ground)
1 onion, finely chopped
1 teaspoon salt
black pepper (to taste)
1 teaspoon chopped fresh parsley
1/2 cup cooked brown rice (I like to cook it in a little vegetable stock for added flavor)
1 1/4 teaspoons garlic powder
2 cans tomato sauce
27 ounces sauerkraut, drained (optional)
1 large can diced tomatoes
1 medium head cabbage
2 tablespoons sugar
3 cups water
Instructions:
Preheat oven to 350 degrees. Mix together the Smart Ground, onion, cooked rice, parsley, salt, pepper, garlic, and 1/2 can of tomato sauce. Core the cabbage and and boil in a pot of water until partly cooked (don't overcook!), then separate the leaves and trim off the stems. Set aside between 24 and 32 whole leaves. Use the remaining leaves to line the bottom of a large baking pan, roasting pan, or casserole dish. Stuff a small handful of the Smart ground mixture in the center of a cabbage leaf. Fold top part of leaf over mixture, then fold in the sides and roll until mixture is completely encased. Lay rolls on top of the extra cabbage leaves in pan. If you are so inclined, spoon some sauerkraut over rolls, then sprinkle with sugar. Mix chopped tomatoes and sauce with water and pour over rolls. Add additional water as necessary to reach top of cabbage rolls. Bake for about an hour or so until cooked through and hot.
Cieszą się! (enjoy!)
Friday, February 1, 2008
Basil Fried Rice

Last night I went out to Red Bamboo in Brooklyn with one of my pals from work. I ordered the sesame "chicken," but after splitting the buffalo wings (and in anticipation of the peanut butter bombe) I only ate about half of my entree. With so much fake chicken and nice brown rice, I figured I could take my leftovers home and make a basil fried rice with the frozen veggies I had in my freezer already (since the leftover "chicken" is just marinated seitan this could easily be made from scratch as well). While I follow recipes closely when I bake, I tend to make up the meals I cook on the fly, so the measurements are loose and can be expanded as necessary. This made enough to feed two people.
Ingredients:
1/2-1 cup cooked rice
fresh basil
1 cup marinated seitan chunks
8-10 steamed or frozen broccoli florets
1/2 cup frozen peas
3/4 cup diced carrots
Medium onion
Soy sauce
Vegetable bullion
Sesame Oil
Vegetable Oil
Instructions:
First, I boiled a small amount of water and added my veggie bullion cube to make a veggie stock. Since my broccoli and peas were frozen I added a small amount of the stock to a microwave safe container and nuked the veggies until they were no longer frozen. I cooked my carrots in the remaining stock until tender. While the veggies were defrosting and cooking, I coarsely chopped the onion and sauteed it in a mix of the vegetable oil and the sesame oil. When the onions were tender I threw in several handfuls of chopped basil (mine was actually frozen from my summer garden; I always grow far, far more than I can use). I let the onions and basil sautee a bit then added the rice and stirred vigorously so it didn't stick to my pan too much. I then added the seitan and veggies, plus about 1/3-1/2 cup of the vegetable stock that I cooked the carrots in and a few dashes of soy sauce. I stirred until the liquied cooked off and was rewarded with a very delightful dinner and enough leftover for lunch tomorrow (leftovers from leftovers! three meals for the cost of one!).
Chocolate Peanut Butter Cups

My wonderful and accommodating mother whipped up some of these for me for my birthday a few years ago, and they were so amazing that I tucked the recipe away for a later date. I think I might make a few batches of these in a couple weeks to give out to my vegan pals for valentine's day. The chocolate and peanut butter combination is basically my favorite thing ever and I used to love reese's pb cups...plus the recipe is pretty easy.
Ingredients:
One package vegan chocolate chips -or- 12 oz. of a fancy vegan chocolate bar
2 tablespoons vegetable shortening
24 paper gem size candy liners -or- (for big pb cups) muffin/cupcake liners
3/4 cup creamy peanut butter
3/4 cup sifted confectioner's sugar
1 tablespoon vegan margarine, melted
Instructions:
Melt chocolate chips or candy bar and vegetable shortening over hot, though not boiling water (this is the double-boiler method, see here for more detailed instructions. You can also just melt the chocolate/shortening in the microwave, but you may need to microwave it a few times during the course of assembling the cups if you go this route). Stir until everything is melted, smooth, and well-combined.
Coat the inside of the candy or muffin liners with chocolate (for the candy liners use one teaspoon of chocolate mixture to do this, for the muffin liners, just be judicious--is should coat the bottom and edges but not just be glopped in there--leave room for the peanut butter). A rubber spatula will help you gently push the chocolate up the sides of the liners. Chill the filled liners in the refrigerator for about 30 minutes until they're hardened. If you're using muffin liners, it might be a good idea to put them in a muffin tin so they don't lose their shape.
Combine the peanut butter, confectioners' sugar, and margarine in a bowl and stir well until blended. Using slightly rounded measured tablespoonfuls or a melon baller, shape the peanut butter filling into balls. Place one pb ball in each chocolate cup and press lightly with your fingers to flatten, then spoon the melted chocolate mixture on top (about one tablespoonful for the candy liners) and smooth over. Place these in the refrigerator again to harden (about 45 minutes).
It's best to keep these refrigerated until you're ready to eat or gift them. Hopefully I won't eat them all before I can package them up nicely for valentine's day.
Subscribe to:
Posts (Atom)
